从 0 到 1:开源 UI 组件库的工程化与自动化
撰写于 2025年1月17日
修改于 2025年5月24日
分类
编程杂记
标签
前端
views
对于刚起步的开源项目来讲,一个重要的一点就是尽量节省花在编码之外的时间,尽量使用工程化、自动化的手段来辅助开发、测试、部署、发布。这里以实现一个简单的 React UI 组件库为例介绍一下工程化和自动化,本文主要包括以下几方面的内容:
初始化项目 直接使用 vite 的脚手架来创建一个项目,命令如下:
然后再删除 src 目录下的全部文件,因为我们并不是开发一个普通的 SPA 站点。
为了导出 TypeScript 中的类型声明,需要安装一个 vite 的 dts 插件:
1 pnpm add -D vite-plugin-dts
再在 vite 的配置文件中,添加一些配置:
1 2 3 4 5 6 7 8 9 10 11 12 13 14 15 16 17 18 19 20 21 22 23 24 25 26 27 28 29 30 31 32 33 34 35 36 37 import { defineConfig } from 'vite' import react from '@vitejs/plugin-react' import dts from 'vite-plugin-dts' export default defineConfig ({ plugins : [ react (), dts ({ insertTypesEntry : true , outDir : './dist/types' , include : ['src/**/*.ts' , 'src/**/*.tsx' , 'src/**/*.d.ts' ], tsconfigPath : './tsconfig.app.json' , }) ], build : { target : 'modules' , outDir : 'dist' , lib : { entry : 'src/index.ts' , name : 'encode-design' , formats : ['es' , 'cjs' ], }, rollupOptions : { external : ['react' , 'react-dom' ], output : { format : 'es' , esModule : true , globals : { react : 'React' , 'react-dom' : 'ReactDOM' , }, }, } } })
还需要修改一下 package.json 中的入口:
1
2
3
"main" : "dist/encode-design.cjs" , "types" : "dist/types/index.d.ts" , "type" : "module" ,
代码质量与风格:ESLint / prettier / husky 三者的分工如下:
eslint :主要是对代码做静态分析,解决语法上的问题prettier :解决不同开发人员之间的代码风格差异husky :在提交代码时,强制执行 eslint 和 prettier 的检查,有无法自动修复的问题时,终止提交,还能对提交的 commit message 格式进行检查,以便生成更友好的 CHANGELOG.md
ESLint 使用 vite 脚手架创建的项目,本身已经配置好了 ESLint,直接使用即可。
1 2 3 4 5 6 7 8 9 10 11 12 13 14 15 16 17 18 19 20 21 22 23 24 25 26 27 28 29 30 31 32 33 34 import js from '@eslint/js' import globals from 'globals' import reactHooks from 'eslint-plugin-react-hooks' import reactRefresh from 'eslint-plugin-react-refresh' import tseslint from 'typescript-eslint' export default tseslint.config ( { ignores : ['dist' , 'coverage' , 'node_modules' , '.storybook' ] }, { extends : [js.configs .recommended , ...tseslint.configs .recommended ], files : ['src/**/*.{ts,tsx}' ], languageOptions : { ecmaVersion : 2020 , globals : globals.browser , }, plugins : { 'react-hooks' : reactHooks, 'react-refresh' : reactRefresh, }, rules : { ...reactHooks.configs .recommended .rules , semi : ['error' , 'always' ], quotes : ['error' , 'single' ], indent : ['error' , 2 ], 'no-trailing-spaces' : ['error' ], 'react-refresh/only-export-components' : [ 'warn' , { allowConstantExport : true }, ], }, }, )
prettier prettier 用于在代码提交前,对代码进行格式化,比如调整缩进,统一逗号、引号的使用等。
先安装依赖:
添加一条 scripts 命令:
1 "format" : "prettier --write ./src" ,
最后再添加配置文件 .prettier :
1 2 3 4 5 6 7 8 { "singleQuote" : true , "semi" : true , "trailingComma" : "all" , "printWidth" : 80 , "tabWidth" : 2 }
可以尝试执行 pnpm format 命令看一下效果。
为了方便开发,还可以直接在编辑器中安装 Prettier 的插件,在保存文件时立即格式化代码。
Husky Husky 是一个 Git Hook 工具,可以帮助我们在执行 Git 命令的时候,预先做一些检查工作。结合其它的专门工具和插件,可以实现这些功能:
借助 ESLint,对代码进行静态分析
借助 prettier ,格式化代码
借助 commitlint ,对 git commit message 的格式进行检查
下面我们来看看它的配置,使用下面的命令来初始化一下 husky:
在提交代码之前,只需要检查本次提交涉及的代码即可,这个可以借助 lint-staged 来控制 eslint 和 prettier 执行的范围。先来安装一下依赖 ,如下:
创建一下 lint-staged 的配置文件 .lintstagedrc.json,确定需要对修改的文件执行哪些命令,这里我们分别执行 Eslint 和 prettier,配置如下:
1
2
3
4
5
6
{ "src/**/*.{ts,tsx}" : [ "prettier --write" , "eslint" ] }
通过上面的配置可以发现,prettier 会修改代码内容,但 Eslint 没有配置修改代码的参数,只是检查,如果有问题,需要手动执行 npm run lint:fix 来手动修复代码。添加一个 scripts 命令,用来执行 lint-staged:
1 "pre-commit" : "lint-staged"
修改一下 husky 配置文件 .husky\pre-commit:
1
2
3
4
5
6
#!/usr/bin/env sh . "$(dirname -- "$0 " ) /_/husky.sh" npm run pre-commit
再来配置一下 commit message 的检查工具 commitlint ,先安装一下依赖:
1 pnpm add @commitlint/config-conventional @commitlint/cli
再添加一下配置文件 commitlint.config.js:
1
2
3
4
5
6
7
8
9
10
11
12
13
14
15
16
17
18
19
20
21
22
23
24
25
26
27
28
29
30
31
32
export default { extends : ['@commitlint/config-conventional' ], rules : { 'type-enum' : [ 2 , 'always' , [ 'build' , 'feat' , 'fix' , 'docs' , 'style' , 'refactor' , 'perf' , 'test' , 'revert' , 'ci' , 'config' , 'chore' , ], ], 'type-empty' : [2 , 'never' ], 'type-case' : [0 , 'always' , 'lower-case' ], 'scope-empty' : [0 ], 'scope-case' : [0 ], 'subject-empty' : [2 , 'never' ], 'subject-case' : [0 ], 'subject-full-stop' : [0 , 'never' , '.' ], 'header-max-length' : [2 , 'always' , 72 ], 'body-leading-blank' : [0 ], 'footer-leading-blank' : [0 , 'always' ], } }
增加一个script配置:
1 "commitlint" : "commitlint --config commitlint.config.js -e -V"
最后在 husky 中添加配置:
1 npx husky add .husky/commit-msg "npm run commitlint"
这样,就完成了 husky 的配置工作。
文档站:storybook Storybook 是一个专业的UI组件库测试、测试和文档解决方案。可以快速根据注释、stories 文件、MDX文件来生成静态页面,并且可以动态调整 props ,直观的给用户展示组件的使用与实际效果。
通过如下的命令可以在项目中初始化 storybook:
1 npx storybook@latest init
此时会创建好 storybook 的配置文件,在 src/stories 目录中创建一些示例文件,并会在 package.json 中添加调试和构建文档站的命令。
我们来编写一个简单的按钮,可以接受 className / size / label / onClick 等 props,做一些简单的操作。
先来安装一下 css 类型声明库:
1 pnpm add -D @types/css-modules
再来安装一个用于合并多个 class 的工具库:
然后来编写 Button 的基本代码:
1 2 3 4 5 6 7 8 9 10 11 12 13 14 15 16 17 18 19 20 21 22 23 24 import { IButtonProps } from './interface' ;import classnames from 'classnames' ;import './index.css' ;const Button = ({ disabled = false , size = 'small' , ...props }: IButtonProps ) => { const { label, onClick, children, className : customClassName, ...rest } = props; const cls = classnames ([ customClassName, 'btn-default' , `btn-${size} ` , ]) return ( <button className ={cls} onClick ={onClick} disabled ={disabled} {...rest }> {children || label} </button > ); }; export default Button ;
编写一些基本样式:
1
2
3
4
5
6
7
8
9
10
11
12
13
// src /components/Button /index.css .btn-default { background-color : #fff ; } .btn-small { padding : 0 10px ; height : 24px ; } .btn-large { padding : 0 20px ; height : 36px ; }
再来编写按钮的 Props 类型声明:
1
2
3
4
5
6
7
8
9
10
11
12
13
14
15
16
17
18
19
20
21
22
23
24
25
26
27
28
29
30
31
32
33
34
35
36
import React from 'react' ;export interface IBaseProps { className ?: string ; style ?: React .CSSProperties ; children ?: React .ReactNode ; } export interface IButtonProps extends IBaseProps { label ?: string ; onClick ?: () => void ; disabled ?: boolean ; size ?: 'large' | 'small' ; }
然后在入口文件中导出按钮:
1 2 3 4 5 6 7 import Button from './components/Button/index' ;export default { Button , };
然后编写一个 stories.ts 文件,生成文档:
1 2 3 4 5 6 7 8 9 10 11 12 13 14 15 16 17 18 19 20 21 22 23 24 import Button from './index' ;import type { Meta , StoryObj } from '@storybook/react' ;import { fn } from '@storybook/test' ;const meta = { title : 'Components/EButton' , component : Button , parameters : { layout : 'centered' , }, tags : ['autodocs' ], args : { onClick : fn () }, } satisfies Meta <typeof Button >; export default meta;type Story = StoryObj <typeof meta>;export const Disabled : Story = { args : { disabled : true , label : 'Button' , }, };
再来尝试编写一个 mdx 文件:
1
2
3
4
5
6
7
8
9
10
11
12
13
14
15
16
17
18
19
20
// src/components/Button/index.mdx import { Meta } from '@storybook/blocks'; import Button from './index'; <Meta title="EButton" description="EButton description" /> # Button ## Props - `onClick` - `disabled` ## Usage ````tsx <Button label="hello world" onClick={() => console.log('clicked')} /> ```` <Button label="hello world" onClick={() => console.log('clicked')} />
这个按钮实现的非常简单,要想实现一个完整功能的,可以参考 Arco Design 的 Button 组件的代码:https://github.com/arco-design/arco-design/blob/main/components/Button/index.tsx 。
单元测试:vitest / @testing-library/react vitest 是一个测试框架工具集,用来完成以下工作:
组织整体的测试工作
统计测试覆盖率
生成测试报告
执行测试结果的检查(断言)
@testing-library/react 则是一个专门用来测试 React 代码的工具集,比如可以模拟渲染、获取渲染结果、模拟点击等。
以下是 vitest 的配置文件:
1 2 3 4 5 6 7 8 9 10 11 12 13 14 import { defineConfig } from 'vite' ;import react from '@vitejs/plugin-react' ;export default defineConfig ({ plugins : [react ()], test : { globals : true , environment : 'jsdom' , coverage : { reporter : [ 'text' , 'json' , 'html' ] } } });
下面是一个按钮的测试例子:
1 2 3 4 5 6 7 8 9 10 11 12 13 14 15 16 17 18 19 20 21 22 23 24 25 26 27 28 29 30 31 32 33 34 35 36 37 38 39 40 import { render } from '@testing-library/react' ;import { describe, test, expect, vi } from 'vitest' ;import Button from '../components/Button/index' ;describe ('test Button' , () => { test ('should render' , () => { const { getByText } = render (<Button label ="test" onClick ={vi.fn()} /> expect (getByText ('test' )).toBeDefined (); }); test ('should call onClick' , () => { const onClick = vi.fn (); const { getByText } = render (<Button label ="test" onClick ={onClick} /> getByText ('test' ).click (); expect (onClick).toHaveBeenCalled (); }); test ('button should be disabled' , () => { const onClick = vi.fn (); const { getByText } = render ( <Button label ="test" disabled ={true} onClick ={onClick} /> ); getByText ('test' ).click (); expect (onClick).not .toHaveBeenCalled (); }); test ('button size' , () => { const { getByText } = render (<Button label ="test" size ="large" /> expect (getByText ('test' ).className ).toContain ('btn-large' ); }) });
版本日志与发布:semantic-release semantic-release 有如下几个功能:
根据特定的规则,将 git commit message 生成 CHANGELOG.md
根据 git commit message ,来生成新的 npm 版本号
执行 npm 包的发布
处理 PR / Issue 等
先来安装 semantic-release 的依赖 :
1 2 3 4 5 pnpm add -D semantic-release pnpm add -D @semantic-release/commit-analyzer @semantic-release/release-notes-generator @semantic-release/changelog @semantic-release/npm @semantic-release/github @semantic-release/git
创建一下配置文件 .releaserc :
1 2 3 4 5 6 7 8 9 10 11 12 13 14 15 16 17 18 19 20 21 22 23 { "repositoryUrl" : "https://github.com/stiekel/encode-design.git" , "branches" : [ "main" ] , "plugins" : [ "@semantic-release/commit-analyzer" , "@semantic-release/release-notes-generator" , [ "@semantic-release/changelog" , { "changelogFile" : "CHANGELOG.md" } ] , "@semantic-release/npm" , "@semantic-release/github" , [ "@semantic-release/git" , { "assets" : [ "CHANGELOG.md" , "package.json" ] } ] ] }
semantic-release 也可以在本地直接执行,但需要通过环境变量配置 npm / github 的 token ,这里我们不考虑这个场景,而使用 Github Actions 来自动执行。
使用 GitHub Actions 来实现自动化 Github Actions 是一套自动化的脚本执行机制,通过在仓库特定目录(.github/workflows)中放置的 yml 文件来配置执行的动作,并在特定的时机触发,比如代码推送、Pull Request、Issue、Watch、Workflow 等时机,甚至 actions 本身执行前后,还能定期执行。可以参考 Github Actions triggers 的介绍。
通过配置 Github Actions,可以在特定的时机发布文档站,自动执行 semantic-release 发布 npm 包等。还能在创建 PR 后,执行代码检查、运行测试,并将执行结果显示在 PR 页面,作为代码合并的前提,让代码的 Review 更加高效。
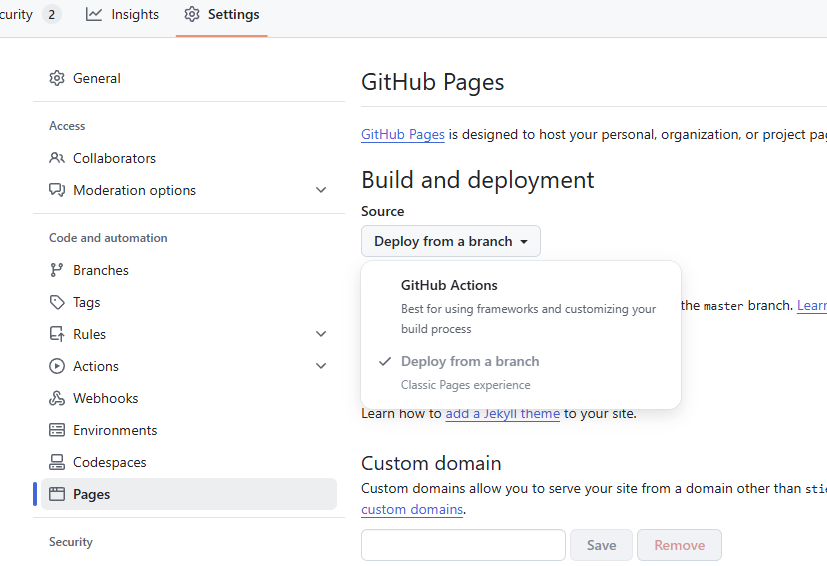
文档站发布至 Github Pages 先打开项目的 Pages 功能,它可以通过向特定分支推送代码,来发布一个站点,在 Github 仓库主页中打开 Settings -> Code and automation -> Pages。
确保 scripts 中有一条文档站的构建命令:
1 "build-storybook" : "storybook build" ,
再配置如下的工作流,这个工作流借助 itovi/github-actions-storybook-to-github-pages 插件完成文档站的生成和发布 Github Pages 的操作:
1
2
3
4
5
6
7
8
9
10
11
12
13
14
15
16
17
18
19
20
21
22
23
24
25
26
27
28
29
30
31
32
33
34
35
36
37
38
// .github/workflows/storybook-github-pages.yml name: Build and Publish Storybook to GitHub Pages on: push: branches: - 'main' workflow_dispatch: permissions: contents: read pages: write id-token: write jobs: deploy: runs-on: ubuntu-latest steps: - uses: actions/checkout@v4 with: fetch-depth: 0 - uses: actions/setup-node@v4 with: node-version: '20' - uses: bitovi/github-actions-storybook-to-github-pages@v1.0.3 with: install_command: npm i -g pnpm && pnpm install build_command: npm run build-storybook path: storybook-static checkout: false
上面是配置在代码推送到 main 分支后,自动更新文档站。
CHANGELOG.md 生成与 npm 包发布 注意,vite 命令行生成的项目中, package.json 有如下一行配置:
需要删除这个标记,才能发布至 npm 中。
将如下的流水线代码,添加到 .github/workflows/release.yml 中:
1 2 3 4 5 6 7 8 9 10 11 12 13 14 15 16 17 18 19 20 21 22 23 24 25 26 27 28 29 30 31 32 33 34 35 36 37 38 39 40 41 42 name: Release on: push: branches: [main ] permissions: contents: write issues: write pull-requests: write packages: write id-token: write jobs: release: runs-on: ubuntu-latest steps: - name: git pull uses: actions/checkout@v3 with: fetch-depth: 0 persist-credentials: false - name: setup node uses: actions/setup-node@v2.5.2 with: node-version: "20.8.1" - name: build run: | npm install -g pnpm@latest-8 pnpm install pnpm run build - name: npm publish env: GITHUB_TOKEN: ${{ secrets.PUBLISH_GH_TOKEN }} NPM_TOKEN: ${{ secrets.PUBLISH_NPM_TOKEN }} run: | npm cache clean --force npx semantic-release
这个配置会在代码推送到 main 分支后执行 semantic-release ,完成如下工作:
根据两次发布之间的 commit ,来生成固定格式的 CHANGELOG ,生成结果可以参考这个示例
根据两次发布之间的 commit ,来确定新的版本号,执行 npm 发布,再将新版本号修改到 package.json 中,并提交到仓库
在仓库中添加版本 tag 的操作
当首次发布时,会直接生成 1.0.0 版本,之后,会根据上次发布后 git commit message 中的关键字来版本号升级规则 ,主要如下:
Commit message 前缀
类型
示例
feat
Feat release
1.0.0 -> 1.1.0
fix
Fix release
1.0.0 -> 1.0.1
perf
Breaking release
1.0.0 -> 2.0.0
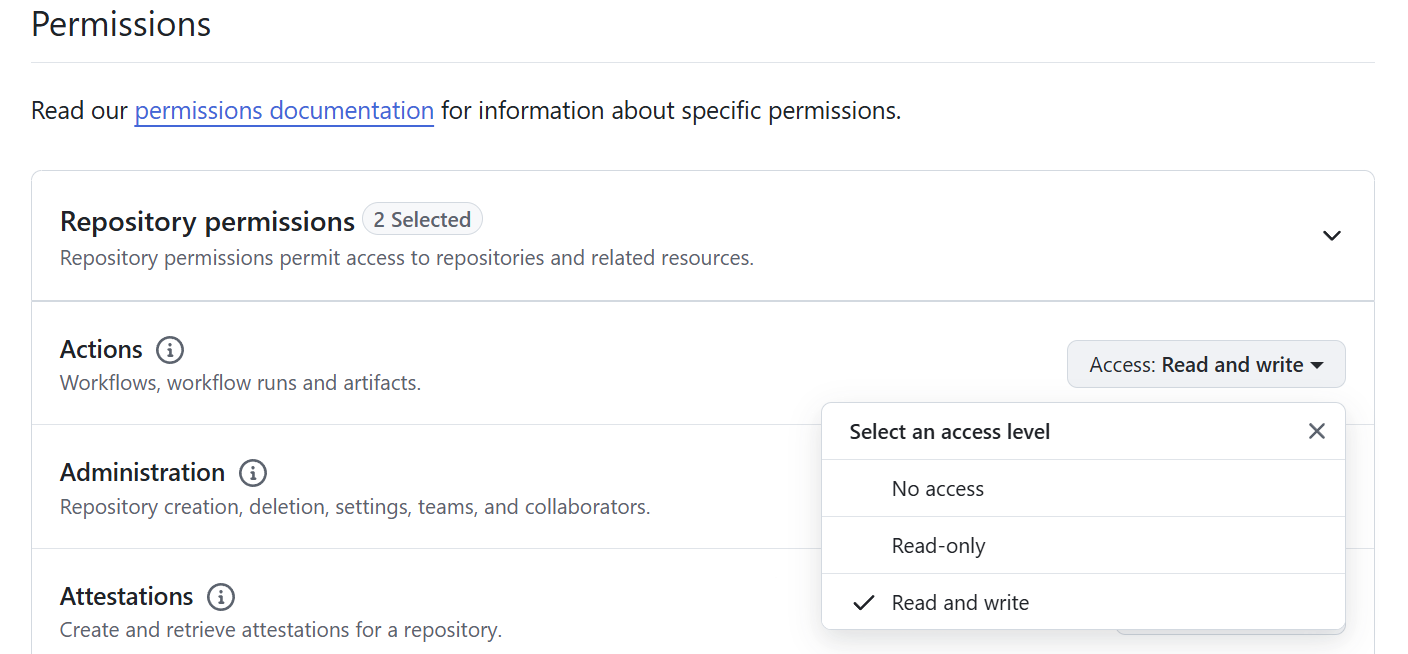
semantic-release 执行上述操作,必须要将 npm / github 的密钥配置到仓库 Action 的环境变量中。先在 npm 上创建一个密钥,注意选择赋予发布权限,如下:
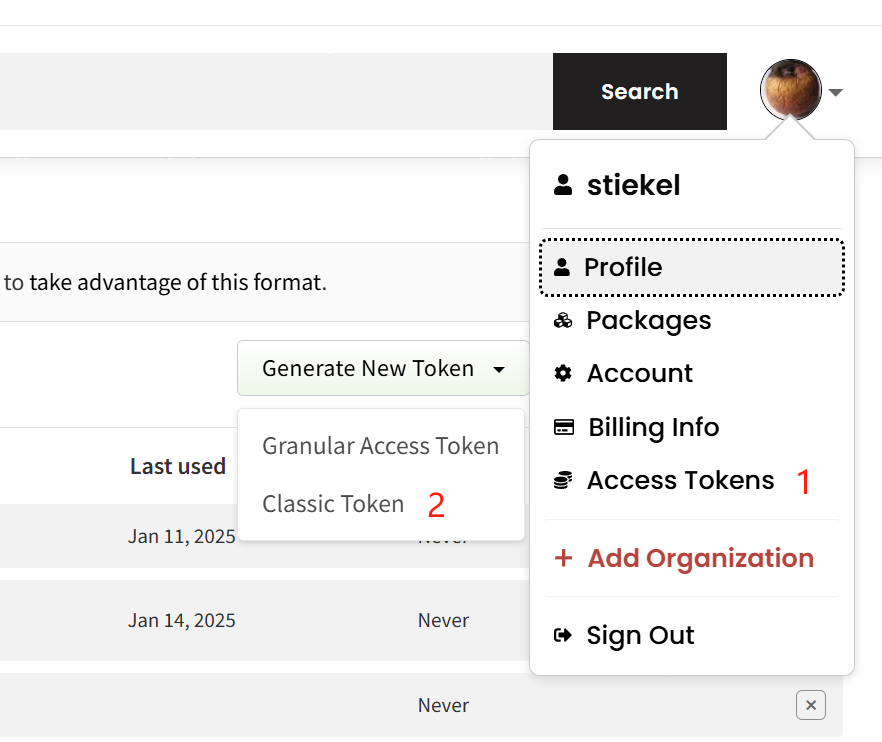
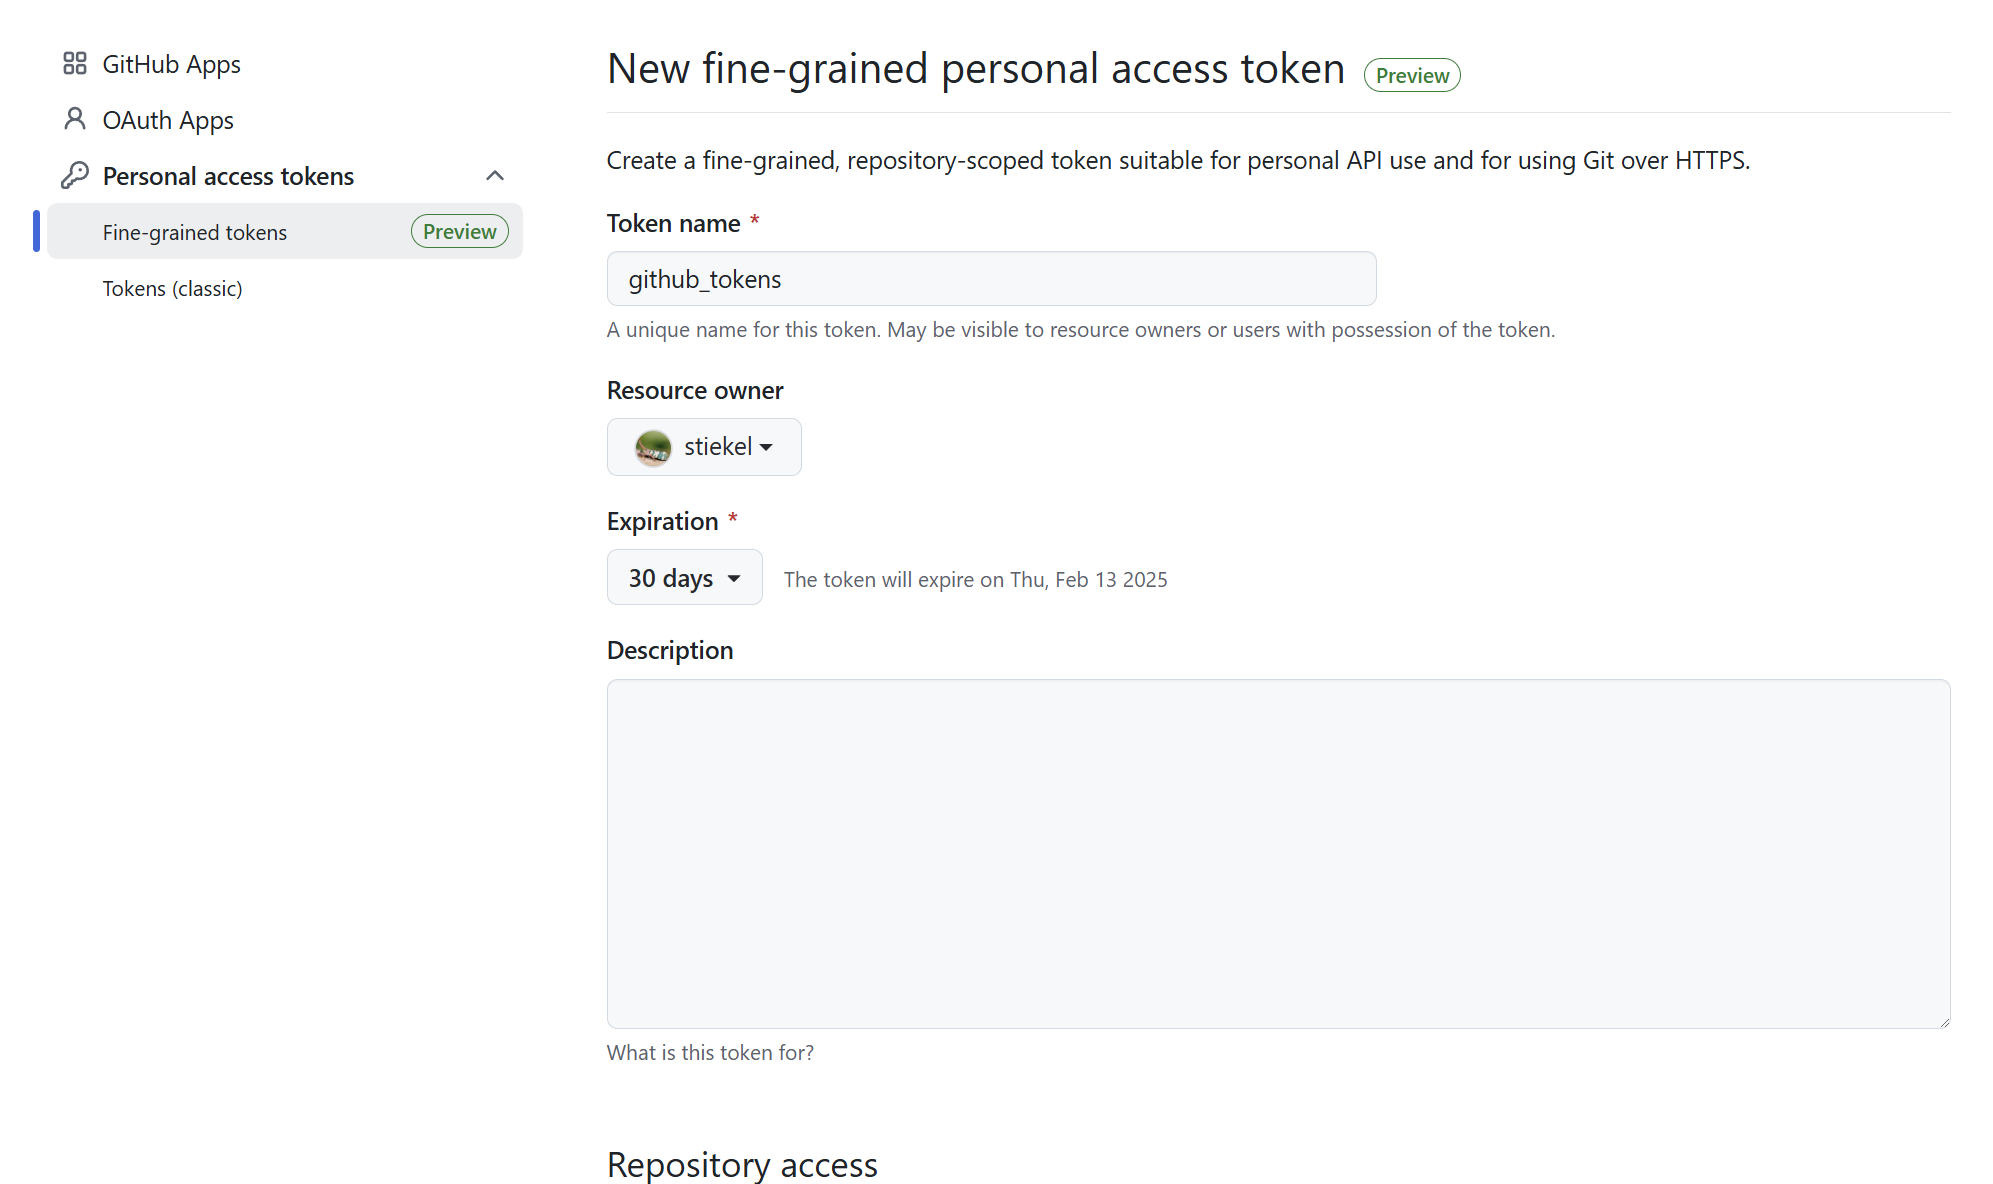
在 Github -> Settings -> Developer Settings -> Personal access tokens -> Fine-grained tokens 中创建 Github 操作密钥(创建时会需要密码认证):
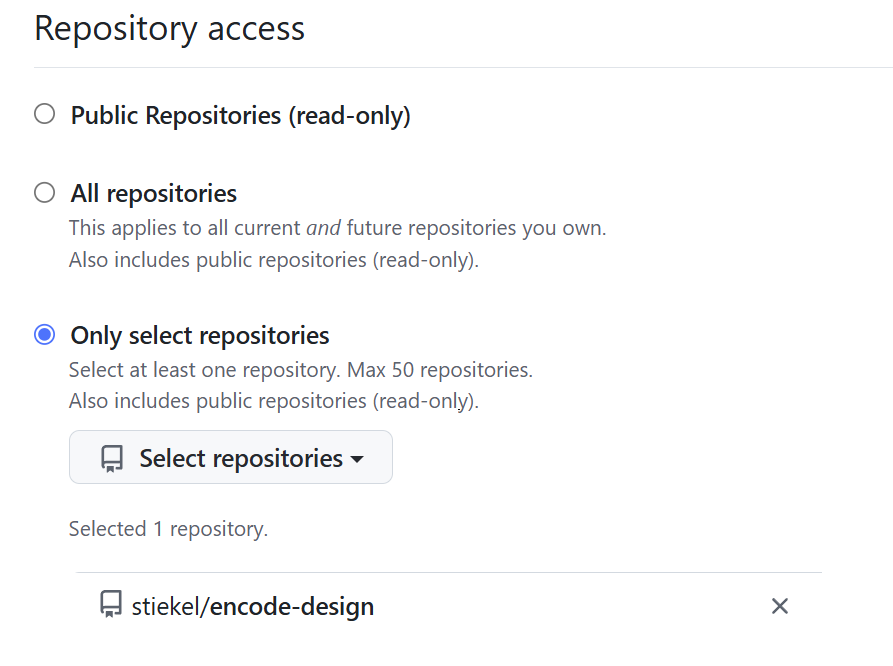
在这个创建页面中,需要注意选择好仓库范围:
在创建页面的【权限】部分中,允许如下一些权限:
Commit statuses: Read and write,提交版本号
Contents : Read and write,修改内容
Deployments: Read and write,部署
Issues: Read and write,处理 issue
Pull requests: Read and write:处理 PR
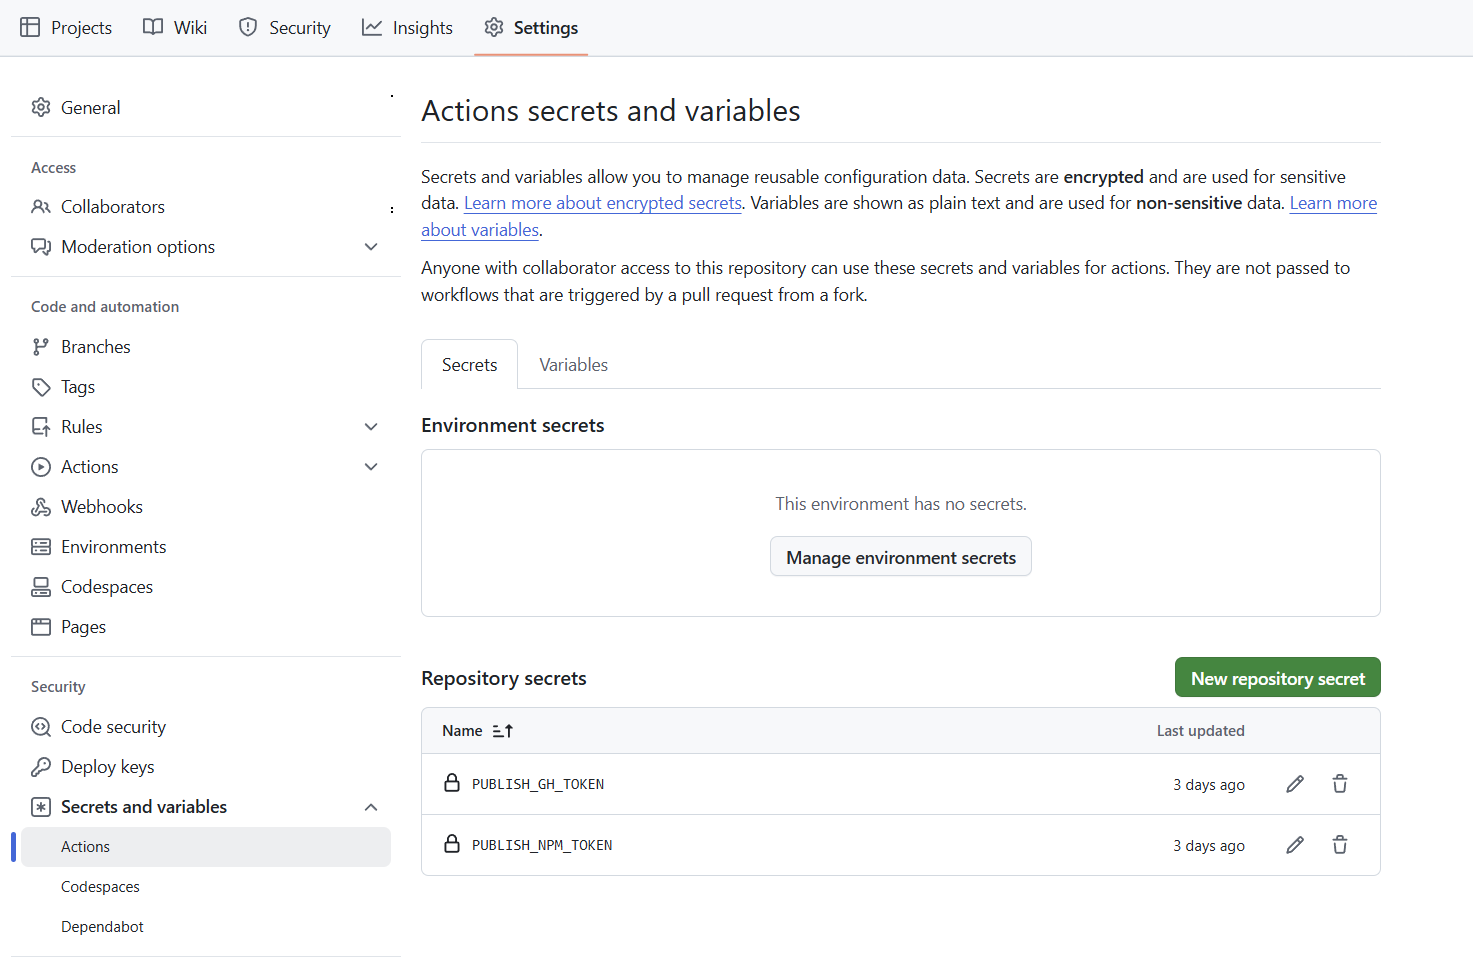
再在仓库的配置中 Settings -> Security -> Secrets and variables -> Actions ,添加上面生成的两个密钥 PUBLISH_GH_TOKEN PUBLISH_NPM_TOKEN :
这样就完成了 semantic-release 执行环境的配置。
现在提交代码,就会自动触发文档站的生成和 npm 包的发布。通过配置更多的流水线,还能处理 PR 和 Issue 。对于中大型项目来讲,自动化的流程已经成为不可或缺的一部分,它对减少人工干预、及时反馈进度、提升工作效率有着立竿见影的效果。